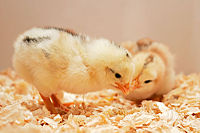
Baby chicks are coming!
I will pick them up at noon today at Mt. Healthy Hatchery.
I had to build them a brooder to keep them in until they are big enough to stay in the coop outside.
I found this DIY brooder on-line at Fresh Eggs Daily blog. A great source of information on anything chicken’s!!
This took about 30 minutes to complete.
You take a plastic storage bin, I used 110 Liter size with clip holders for the lid
For ventilation and heating you need to cut out a hole in the lid leaving 2″ + lip around perimeter.
I measured dimensions out with a ruler and marked with a sharpie marker, than we drilled holes in corners with a 3/4 ” drill bit (to help turn corners and allow a place to start with saw. 
We placed lid on our trash can to allow it to overhang, but give us enough stability to cut. Follow along your mark with hand saw (Two sets of hand help here!)

Once lid hole was cut out I used a hand sander that we had to soften edges.

Cut board to form perimeter for wire to be attached. It doesn’t have to be perfect or any certain size of wood, just enough to hold wire in place. You can see Larry laying wood along plastic top and making a quick mark to saw along.

Lay the cut out part of lid on top of chicken wire to use as a template, cut 2″ wider than lid so you will have enough wire to secure on board. I used wire snips to cut.

Lay cut wood dow on flat surface, then wire and top with lid.
Using small screws and drill, place screws through lid to wood to secure wire.

I also added a small perch for the chicks. I picked up a 1/2″ dowel rod at Mitchell’s cut it to fit in corner. Pre-drilled the rod and hole through plastic bin with 3/16 drill bit and used longer screw to secure.


Your done!
Because chicks need a non-slippery surface or they can do the splits and get something called ‘spraddle legs‘ I lined the box with newspaper and top with rubber shelf liner. You can easily remove both, replace the newspaper and clean the liner.
The reason I am not using shavings is because they are tough to clean and the chicks continually knock them in the waterer.
I also need a chick waterer, feeder that allows the chicks to eat without getting into the food, a heat lamp to keep your chicks warm and a small thermometer to confirm temp. in brooder. (I’m picking up a small digital thermometer on the way to the hatchery today.)


Now we are all set up and waiting for the occupants to arrive!
Related articles
- 2012 – New Chicks – Your Brooder and Coop (survivalfarm.wordpress.com)
- Ghosts of brooders past and present (chismheritagefarm.wordpress.com)


I strongly agree with many points in the post you referenced but we do not offer medicated feed. We offer yogurt.
Yes, the wood chips can be a bit of a pain but chickens are built to scratch…it’s a very chicken-ey thing to do. Non-cedar wood chips are not only an appropriate scratching medium, they are absorbant, compost readily, provide a home for things chicks like to eat and are relatively inexpensive. Yes, they can get in the drinkers and in the feed but if you keep the drinker elevated to just below their beak you can minimize the mess.
You can either allow the bedding to build up and compost over time (a good thing for chick health) or remove the chips and mulch your garden with them. The blog you reference above has a nice article on deep bedding in her henhouse. The same applies in the brooder. That said, warm, composting bedding may not be an option in your container.
Nice post and good luck with the new chicks. Let me know what kind you ordered. I have never used Mt. Hood hatchery but would like to know what you think of their products and service.
Thank you for all your suggestions. The chicks made it home safe and sound from the Hatchery, which is always a pleasant experience. I brought home Araucana, Bar Rock, Buff Orpington, Wyandotte and Speckeled Sussex.